
We assume that we want to use an iSCSI disk for the hypervisor zone. If the hypervisor doesn’t need iSCSI disk, them SAN and SAN2 can be eliminated.
At at least four physical network connections are needed:
1- Connection to access switch (for VMs Internet access and any possible VM VLAN)
2- Connection to SAN switch (for iSCSI)
3- Connection to a non-SAN switch (for SAN2 and hypervisor Internet access)
4- Connection to any switch (for OnApp Management and Production VLAN)
The following is the switch port and OS interface configuration for above 4 connections in the same order. The actual order and interface names may vary.
1- The switch port is in tagged VLAN 10, 11 and tagged for any possible customer VLAN. In OS the main interface doesn’t need any IP but it has to be renamed to “eth0”.
2- The switch port is only in SAN (untagged VLAN ID 2). This VLAN has to be configured to support jumbo frames. The interface on OS gets an IP from subnet 192.168.200.0/23 and MTU=9000
3- The switch port is in untagged Internet VLAN and tagged SAN2 (VLAN ID 2002). In OS the main interface gets a public IP and the VLAN sub-interface gets an IP from the range 172.16.10.0/23
4- The switch port is in untagged OnApp Management VLAN (ID 2101) and tagged OnApp provisioning VLAN (ID 2102).
In OS the main interface gets an IP from subnet 192.168.101.0/24. The sub-interface for OnApp provisioning VLAN gets an IP from range 192.168.102.0/24.
5- If we want to add a second connection to SAN switch the interface gets an IP from range 192.168.155.0/24.
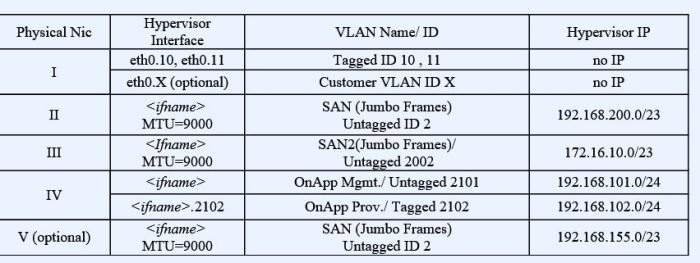
(The Nic numbering in the table doesn’t represent the physical Nic numbering on the server or hypervisor interface name.)

These KBs are also relevant:
How to set up tagged and untagged VLANs in different switch models
How to create a sub-interface for tagged VLAN in CentOS
How to setup a new hypervisor for OnApp Based on CentOS 6
